目录
- Server 与 Agent 交互机制分析
- Server 如何初始化 Agent 的详细流程
- [Agent]Voice Assistant Graph 详细流程和数据交互分析
- [extension]WeatherAPI Tool Python 扩展分析
- [extension]OpenAI ChatGPT Python 扩展详细分析
- LLM 工具调用实现分析
Server 与 Agent 交互机制分析
Server 服务与 Agent 中的扩展交互主要通过以下几种方式:
func (s *HttpServer) processProperty(req *StartReq) (propertyJsonFile string, logFile string, err error) {
    // 读取基础 property.json
    content, err := os.ReadFile(PropertyJsonFile)
    // ...

    // 根据请求修改配置文件,特别是针对扩展的配置
    for extensionName, props := range req.Properties {
        if extensionName != "" {
            for prop, val := range props {
                // 修改特定扩展的属性
                for _, graph := range newGraphs {
                    graphMap, _ := graph.(map[string]interface{})
                    nodes, _ := graphMap["nodes"].([]interface{})
                    for _, node := range nodes {
                        nodeMap, _ := node.(map[string]interface{})
                        if nodeMap["name"] == extensionName {
                            properties := nodeMap["property"].(map[string]interface{})
                            properties[prop] = val
                        }
                    }
                }
            }
        }
    }

    // 保存到临时配置文件
    propertyJsonFile = fmt.Sprintf("%s/property-%s-%s.json", s.config.LogPath, url.QueryEscape(req.ChannelName), ts)
    os.WriteFile(propertyJsonFile, []byte(modifiedPropertyJson), 0644)
    // ...
}
2. 启动 Agent 进程
3. 运行时与 Agent 通信
Agent 启动后创建 HTTP 服务,Server 可通过 HTTP 请求与 Agent 通信:
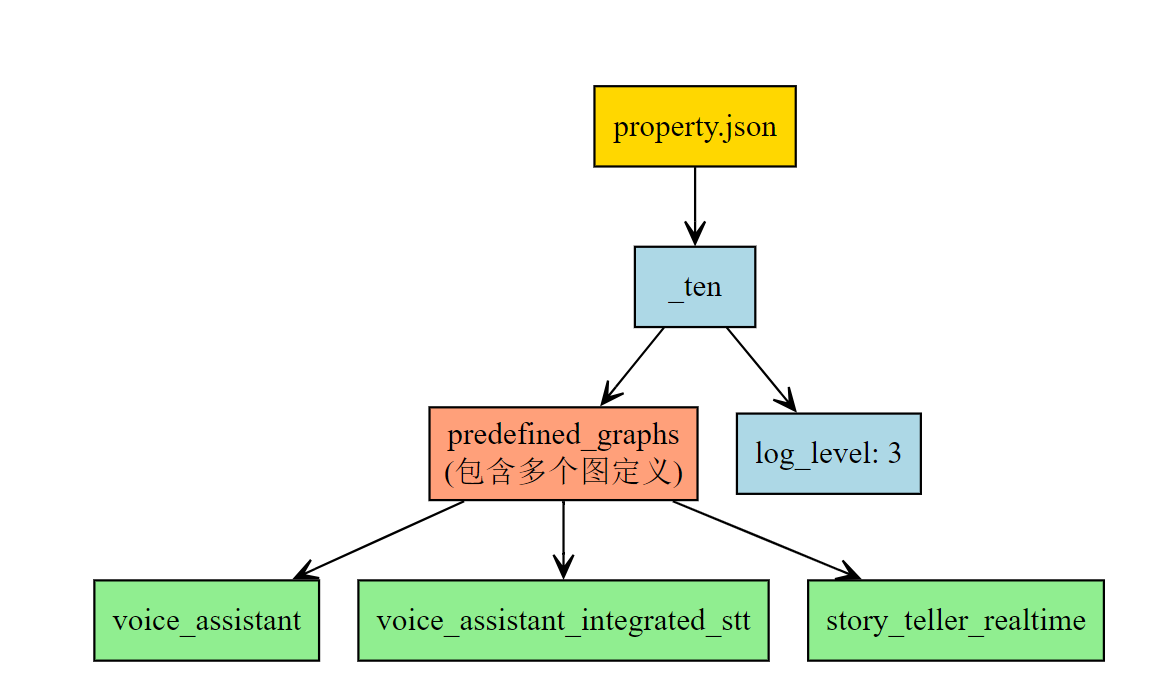
- property.json 的主要结构包含
_ten 对象,其中有 predefined_graphs 数组和 log_level 值。
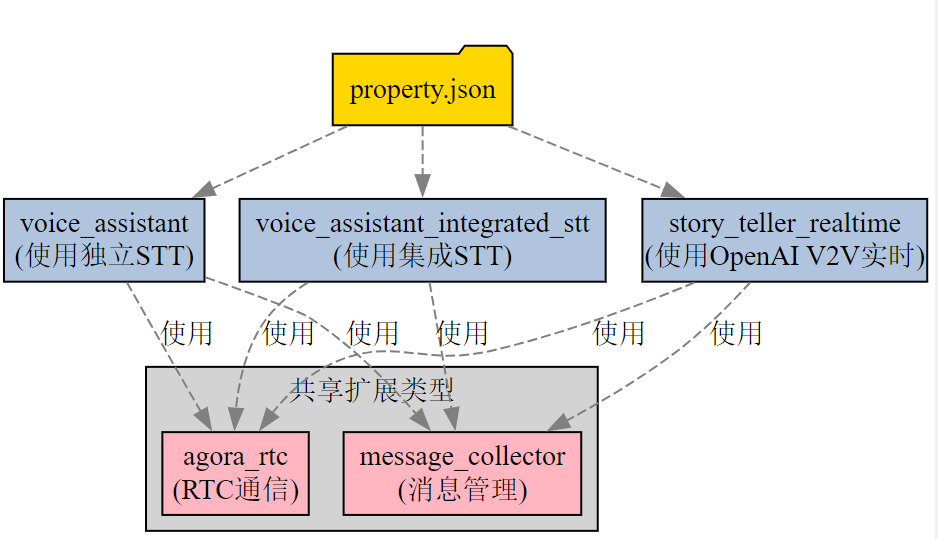
- predefined_graphs 包含三个图定义:
voice_assistant:基本语音助手,使用独立的STTvoice_assistant_integrated_stt:使用集成STT的语音助手story_teller_realtime:实时故事讲述者,使用OpenAI的v2v
- 每个图 都包含:
nodes:定义了扩展模块及其配置connections:定义了扩展之间的数据流和事件流
- 数据流类型 包括:
audio_frame:音频数据data:文本和内容数据cmd:控制命令
这些图展示了不同AI代理配置的声明式定义,以及它们如何通过连接不同扩展模块来构建完整的数据处理流水线。
顶层结构图
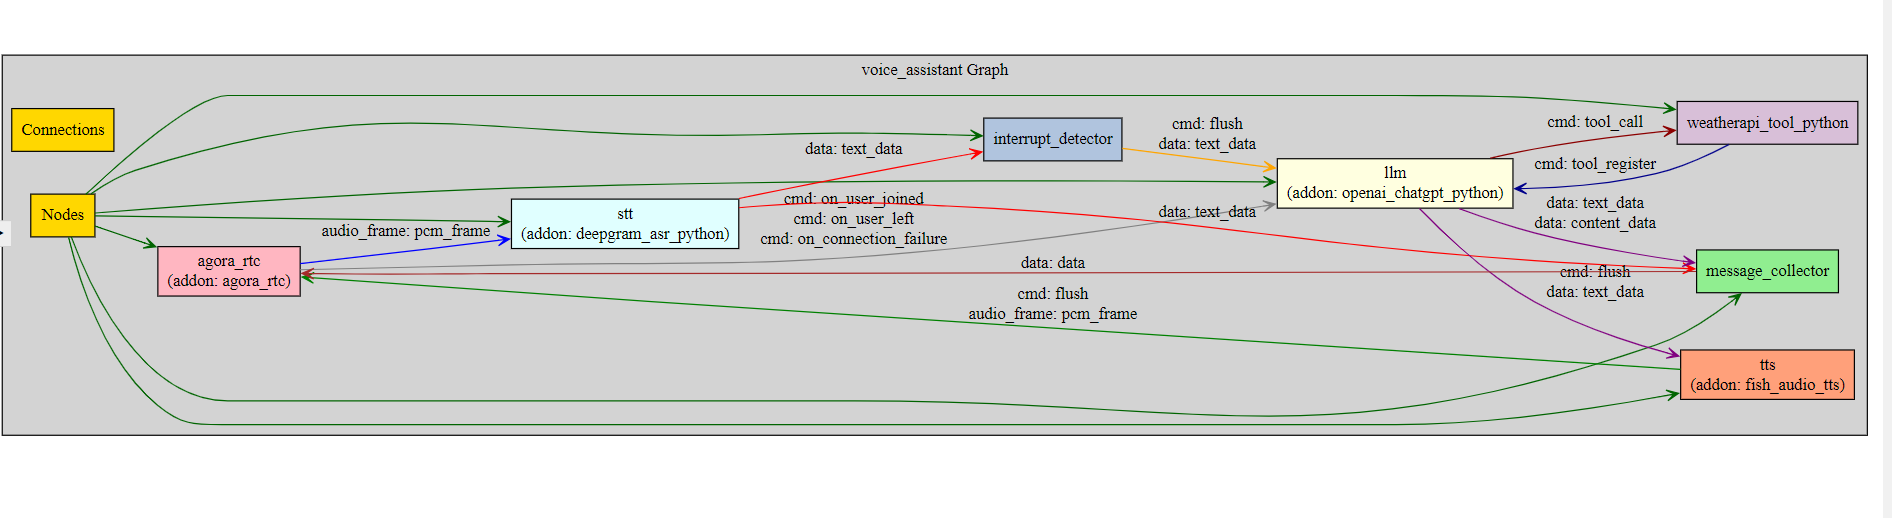
voice_assistant 图结构
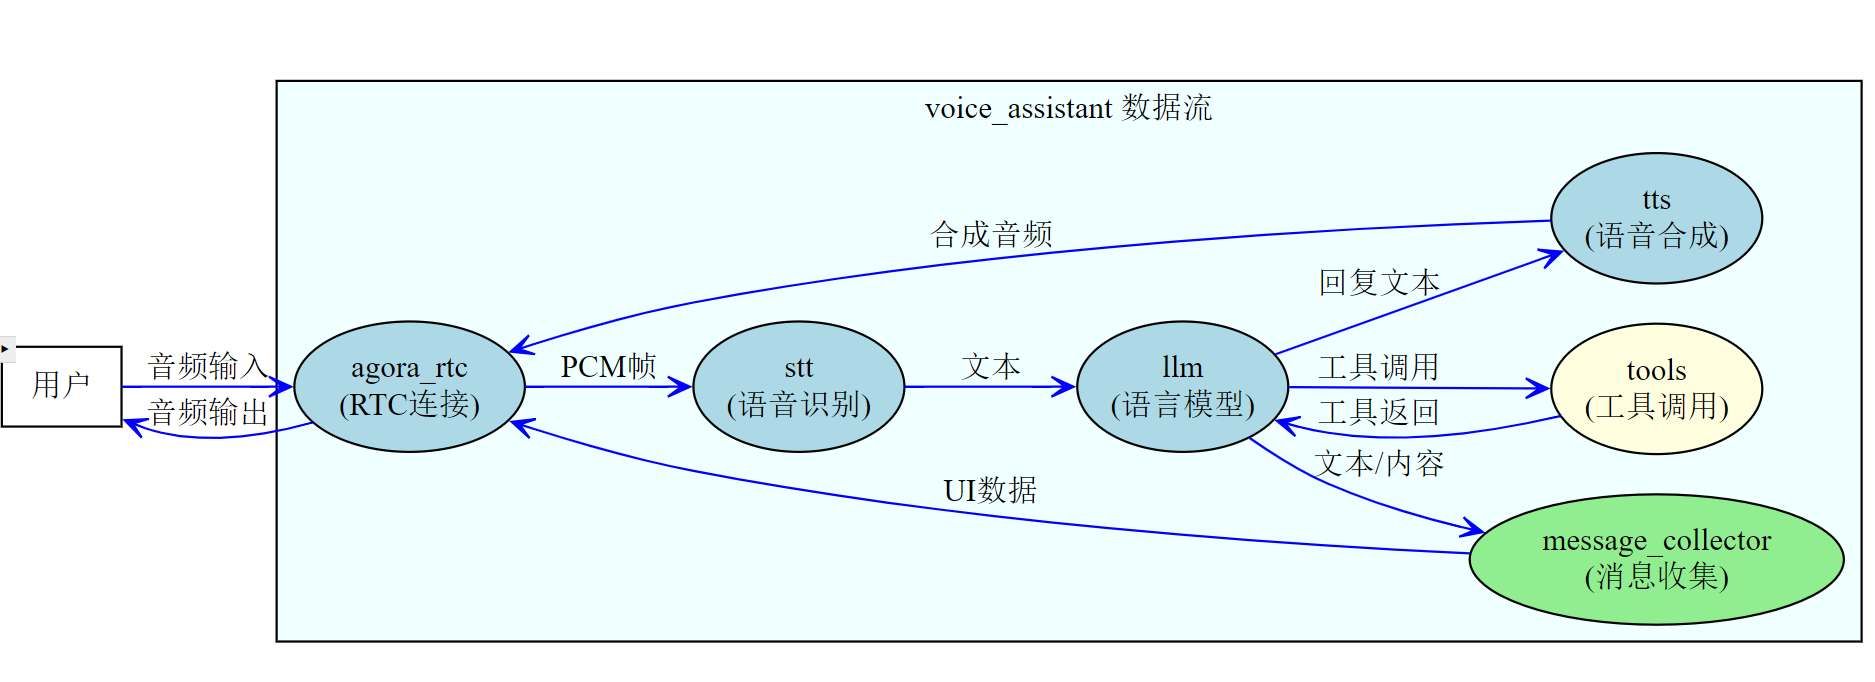
数据流概览图
所有图之间的关系
<think>
从你提供的property.json和之前看到的server代码,我需要分析server如何初始化这些agents。这个property.json文件定义了多个predefined_graphs,每个graph包含不同的节点(nodes)和连接(connections)配置。
从代码中我可以看到初始化过程:
- 读取基础property.json文件
- 根据请求中指定的graph_name筛选相应的graph
- 修改配置(如插入环境变量、修改连接信息等)
- 保存为一个新的临时配置文件
- 然后创建Worker对象并调用worker.start()
- worker.start()通过exec.Command启动agent进程,传入修改后的配置文件路径
所以,关键在于客户端通过API请求指定要使用的graph,server根据这个请求筛选和修改property.json,然后启动agent进程。
</think>
Server 如何初始化 Agent 的详细流程
从你提供的 property.json 和 server 代码,我可以详细解释整个 agent 初始化流程:
1. Client API 请求触发初始化
客户端通过 HTTP 请求调用 /start 接口,指定要使用的图和参数:
{
"request_id": "c1912182-924c-4d15-a8bb-85063343077c",
"channel_name": "test",
"user_uid": 176573,
"graph_name": "voice_assistant", // 指定要使用的图
"properties": {
"llm": { // 覆盖特定扩展的属性
"model": "gpt-4o"
}
}
}
2. Server 处理请求并准备配置
handlerStart 函数接收请求后:
func (s *HttpServer) handlerStart(c *gin.Context) {
// ...
req.WorkerHttpServerPort = getHttpServerPort()
propertyJsonFile, logFile, err := s.processProperty(&req)
// ...
worker := newWorker(req.ChannelName, logFile, s.config.Log2Stdout, propertyJsonFile)
// ...
if err := worker.start(&req); err != nil {
// ...
}
workers.SetIfNotExist(req.ChannelName, worker)
// ...
}
3. 生成定制的配置文件
processProperty 函数处理你的 property.json:
func (s *HttpServer) processProperty(req *StartReq) (propertyJsonFile string, logFile string, err error) {
// 读取原始 property.json
content, err := os.ReadFile(PropertyJsonFile)
// 解析 JSON
var propertyJson map[string]interface{}
json.Unmarshal(content, &propertyJson)
// 获取 graph_name 并查找
graphName := req.GraphName // 例如 "voice_assistant"
// 从 property.json 中筛选指定的图
tenSection := propertyJson["_ten"].(map[string]interface{})
predefinedGraphs := tenSection["predefined_graphs"].([]interface{})
// 只保留需要的图
var newGraphs []interface{}
for _, graph := range predefinedGraphs {
graphMap := graph.(map[string]interface{})
if graphMap["name"] == graphName {
newGraphs = append(newGraphs, graph)
}
}
// 确保图会自动启动
for _, graph := range newGraphs {
graphMap := graph.(map[string]interface{})
graphMap["auto_start"] = true
}
// 应用客户端请求中的扩展属性覆盖
for extensionName, props := range req.Properties {
// 例如修改 llm 扩展的 model 属性
// ...
}
// 生成新的配置文件
propertyJsonFile = fmt.Sprintf("%s/property-%s-%s.json", s.config.LogPath, url.QueryEscape(req.ChannelName), ts)
os.WriteFile(propertyJsonFile, []byte(modifiedPropertyJson), 0644)
return propertyJsonFile, logFile, nil
}
4. 启动 Agent 进程
worker.start() 方法启动 agent 进程:
func (w *Worker) start(req *StartReq) (err error) {
// 执行命令,传入生成的配置文件
shell := fmt.Sprintf("cd /app/agents && %s --property %s", workerExec, w.PropertyJsonFile)
cmd := exec.Command("sh", "-c", shell)
// 配置进程输出...
if err = cmd.Start(); err != nil {
return
}
// 保存 PID 和监控进程...
}
5. Agent 加载配置并初始化扩展
当 agent 进程启动后:
agents/main.go 中的 startAppBlocking 函数加载配置文件OnConfigure 函数将配置文件内容传递给 ten 框架- 框架基于配置创建实例化扩展(llm、tts 等)
- 根据配置的
connections 建立扩展之间的通信路径
6. 节点和连接的作用
从你的 property.json 中,每个图(如 "voice_assistant")定义了:
节点 (nodes):
{
"type": "extension",
"name": "llm",
"addon": "openai_chatgpt_python",
"extension_group": "chatgpt",
"property": { /* 配置参数 */ }
}
连接 (connections):
{
"extension": "stt",
"data": [
{
"name": "text_data",
"dest": [
{"extension": "llm"}
]
}
]
}
这些定义了数据流向和事件处理路径。比如 "stt" 识别到的文本会发送到 "llm",而 "llm" 生成的回复会发送到 "tts" 进行语音合成。
7. 扩展之间的协作机制
以 "voice_assistant" 为例:
- "agora_rtc" 扩展从 RTC 通道获取音频
- 音频传递给 "stt" 扩展进行语音识别
- 文本传递给 "llm" 扩展生成回复
- 回复传递给 "tts" 扩展转换为语音
- 合成的语音通过 "agora_rtc" 播放给用户
每个扩展都是独立模块,但通过 property.json 中的 "connections" 定义形成一个完整的处理流水线。
server 通过管理这一过程,使得客户端不需要了解内部复杂性,只需选择合适的图并提供必要参数即可启动完整的 AI 代理服务。
<think>
我需要详细分析voice_assistant graph中的流程和数据交互逻辑。从之前看到的property.json文件,我可以提取以下信息:
- 节点(Nodes)类型:
- cmd: 命令流,控制指令
- data: 数据流,文本和结构化内容
- audio_frame: 音频数据流
让我详细分析voice_assistant中的数据流和交互逻辑,包括整个会话过程中的数据流动方向和处理流程。
</think>
[Agent]Voice Assistant Graph 详细流程和数据交互分析
1. 架构总览
voice_assistant 图表示一个完整的语音助手系统,它将多个功能模块(扩展)连接成一个处理流水线。
用户语音 → RTC → STT → LLM → TTS → RTC → 用户听到回复
2. 节点(扩展)功能说明
func (s *HttpServer) processProperty(req *StartReq) (propertyJsonFile string, logFile string, err error) {
// 读取基础 property.json
content, err := os.ReadFile(PropertyJsonFile)
// ...
// 根据请求修改配置文件,特别是针对扩展的配置
for extensionName, props := range req.Properties {
if extensionName != "" {
for prop, val := range props {
// 修改特定扩展的属性
for _, graph := range newGraphs {
graphMap, _ := graph.(map[string]interface{})
nodes, _ := graphMap["nodes"].([]interface{})
for _, node := range nodes {
nodeMap, _ := node.(map[string]interface{})
if nodeMap["name"] == extensionName {
properties := nodeMap["property"].(map[string]interface{})
properties[prop] = val
}
}
}
}
}
}
// 保存到临时配置文件
propertyJsonFile = fmt.Sprintf("%s/property-%s-%s.json", s.config.LogPath, url.QueryEscape(req.ChannelName), ts)
os.WriteFile(propertyJsonFile, []byte(modifiedPropertyJson), 0644)
// ...
}
3. 运行时与 Agent 通信
Agent 启动后创建 HTTP 服务,Server 可通过 HTTP 请求与 Agent 通信:
- property.json 的主要结构包含
_ten 对象,其中有 predefined_graphs 数组和 log_level 值。
- predefined_graphs 包含三个图定义:
voice_assistant:基本语音助手,使用独立的STTvoice_assistant_integrated_stt:使用集成STT的语音助手story_teller_realtime:实时故事讲述者,使用OpenAI的v2v
- 每个图 都包含:
nodes:定义了扩展模块及其配置connections:定义了扩展之间的数据流和事件流
- 数据流类型 包括:
audio_frame:音频数据data:文本和内容数据cmd:控制命令
_ten 对象,其中有 predefined_graphs 数组和 log_level 值。voice_assistant:基本语音助手,使用独立的STTvoice_assistant_integrated_stt:使用集成STT的语音助手story_teller_realtime:实时故事讲述者,使用OpenAI的v2v
nodes:定义了扩展模块及其配置connections:定义了扩展之间的数据流和事件流
audio_frame:音频数据data:文本和内容数据cmd:控制命令
这些图展示了不同AI代理配置的声明式定义,以及它们如何通过连接不同扩展模块来构建完整的数据处理流水线。
顶层结构图
voice_assistant 图结构
数据流概览图
所有图之间的关系
<think>
从你提供的property.json和之前看到的server代码,我需要分析server如何初始化这些agents。这个property.json文件定义了多个predefined_graphs,每个graph包含不同的节点(nodes)和连接(connections)配置。
从代码中我可以看到初始化过程:
- 读取基础property.json文件
- 根据请求中指定的graph_name筛选相应的graph
- 修改配置(如插入环境变量、修改连接信息等)
- 保存为一个新的临时配置文件
- 然后创建Worker对象并调用worker.start()
- worker.start()通过exec.Command启动agent进程,传入修改后的配置文件路径
所以,关键在于客户端通过API请求指定要使用的graph,server根据这个请求筛选和修改property.json,然后启动agent进程。
</think>
Server 如何初始化 Agent 的详细流程
从你提供的 property.json 和 server 代码,我可以详细解释整个 agent 初始化流程:
1. Client API 请求触发初始化
客户端通过 HTTP 请求调用 /start 接口,指定要使用的图和参数:
{
"request_id": "c1912182-924c-4d15-a8bb-85063343077c",
"channel_name": "test",
"user_uid": 176573,
"graph_name": "voice_assistant", // 指定要使用的图
"properties": {
"llm": { // 覆盖特定扩展的属性
"model": "gpt-4o"
}
}
}
2. Server 处理请求并准备配置
handlerStart 函数接收请求后:
func (s *HttpServer) handlerStart(c *gin.Context) {
// ...
req.WorkerHttpServerPort = getHttpServerPort()
propertyJsonFile, logFile, err := s.processProperty(&req)
// ...
worker := newWorker(req.ChannelName, logFile, s.config.Log2Stdout, propertyJsonFile)
// ...
if err := worker.start(&req); err != nil {
// ...
}
workers.SetIfNotExist(req.ChannelName, worker)
// ...
}
3. 生成定制的配置文件
processProperty 函数处理你的 property.json:
func (s *HttpServer) processProperty(req *StartReq) (propertyJsonFile string, logFile string, err error) {
// 读取原始 property.json
content, err := os.ReadFile(PropertyJsonFile)
// 解析 JSON
var propertyJson map[string]interface{}
json.Unmarshal(content, &propertyJson)
// 获取 graph_name 并查找
graphName := req.GraphName // 例如 "voice_assistant"
// 从 property.json 中筛选指定的图
tenSection := propertyJson["_ten"].(map[string]interface{})
predefinedGraphs := tenSection["predefined_graphs"].([]interface{})
// 只保留需要的图
var newGraphs []interface{}
for _, graph := range predefinedGraphs {
graphMap := graph.(map[string]interface{})
if graphMap["name"] == graphName {
newGraphs = append(newGraphs, graph)
}
}
// 确保图会自动启动
for _, graph := range newGraphs {
graphMap := graph.(map[string]interface{})
graphMap["auto_start"] = true
}
// 应用客户端请求中的扩展属性覆盖
for extensionName, props := range req.Properties {
// 例如修改 llm 扩展的 model 属性
// ...
}
// 生成新的配置文件
propertyJsonFile = fmt.Sprintf("%s/property-%s-%s.json", s.config.LogPath, url.QueryEscape(req.ChannelName), ts)
os.WriteFile(propertyJsonFile, []byte(modifiedPropertyJson), 0644)
return propertyJsonFile, logFile, nil
}
4. 启动 Agent 进程
worker.start() 方法启动 agent 进程:
func (w *Worker) start(req *StartReq) (err error) {
// 执行命令,传入生成的配置文件
shell := fmt.Sprintf("cd /app/agents && %s --property %s", workerExec, w.PropertyJsonFile)
cmd := exec.Command("sh", "-c", shell)
// 配置进程输出...
if err = cmd.Start(); err != nil {
return
}
// 保存 PID 和监控进程...
}
5. Agent 加载配置并初始化扩展
当 agent 进程启动后:
agents/main.go中的startAppBlocking函数加载配置文件OnConfigure函数将配置文件内容传递给 ten 框架- 框架基于配置创建实例化扩展(llm、tts 等)
- 根据配置的
connections建立扩展之间的通信路径
6. 节点和连接的作用
从你的 property.json 中,每个图(如 "voice_assistant")定义了:
节点 (nodes):
{ "type": "extension", "name": "llm", "addon": "openai_chatgpt_python", "extension_group": "chatgpt", "property": { /* 配置参数 */ } }连接 (connections):
{ "extension": "stt", "data": [ { "name": "text_data", "dest": [ {"extension": "llm"} ] } ] }
这些定义了数据流向和事件处理路径。比如 "stt" 识别到的文本会发送到 "llm",而 "llm" 生成的回复会发送到 "tts" 进行语音合成。
7. 扩展之间的协作机制
以 "voice_assistant" 为例:
- "agora_rtc" 扩展从 RTC 通道获取音频
- 音频传递给 "stt" 扩展进行语音识别
- 文本传递给 "llm" 扩展生成回复
- 回复传递给 "tts" 扩展转换为语音
- 合成的语音通过 "agora_rtc" 播放给用户
每个扩展都是独立模块,但通过 property.json 中的 "connections" 定义形成一个完整的处理流水线。
server 通过管理这一过程,使得客户端不需要了解内部复杂性,只需选择合适的图并提供必要参数即可启动完整的 AI 代理服务。
<think>
我需要详细分析voice_assistant graph中的流程和数据交互逻辑。从之前看到的property.json文件,我可以提取以下信息:
- 节点(Nodes)类型:
- cmd: 命令流,控制指令
- data: 数据流,文本和结构化内容
- audio_frame: 音频数据流
让我详细分析voice_assistant中的数据流和交互逻辑,包括整个会话过程中的数据流动方向和处理流程。
</think>
[Agent]Voice Assistant Graph 详细流程和数据交互分析
1. 架构总览
voice_assistant 图表示一个完整的语音助手系统,它将多个功能模块(扩展)连接成一个处理流水线。
用户语音 → RTC → STT → LLM → TTS → RTC → 用户听到回复
2. 节点(扩展)功能说明
| 扩展名称 | 实际模块 | 功能描述 |
|---|---|---|
| agora_rtc | agora_rtc | 音频流传输、实时通信,系统的输入/输出门户 |
| stt | deepgram_asr_python | 语音识别,将音频转为文本 |
| llm | openai_chatgpt_python | 大语言模型,理解用户意图并生成回复 |
| tts | fish_audio_tts | 文本转语音,将LLM文本回复转为语音 |
| interrupt_detector | interrupt_detector_python | 检测用户中断,用于打断当前AI回复 |
| message_collector | message_collector | 收集并管理对话消息,用于UI展示 |
| weatherapi_tool_python | weatherapi_tool_python | 天气查询工具,增强LLM功能 |
3. 详细数据流与交互流程
3.1 用户语音输入流程
agora_rtc [音频帧] → stt [文本] → 两个分支:
                                  ├─→ interrupt_detector
                                  └─→ message_collector
- 音频获取:
stt(Deepgram) 将音频转换为文本- 通过
data类型的text_data连接,识别结果同时发送到两个地方:interrupt_detector: 检查用户是否尝试打断当前对话message_collector: 记录用户输入文本用于UI显示
3.2 中断处理流程
interrupt_detector [检测到中断] → llm [flush命令] → tts [停止生成]
                    [文本数据] → llm [处理新输入]
- 中断检测:
llm收到flush命令后停止当前生成- 接收新的文本输入并开始新的处理
3.3 语言理解和回复生成
llm [文本回复] → 两条路径:
                ├─→ tts [语音合成]
                └─→ message_collector [UI显示]
    [工具调用] → weatherapi_tool_python [API查询] → llm
- 文本处理:
tts: 进行语音合成message_collector: 收集对话记录
- 当用户询问天气相关问题时,
llm通过cmd类型的tool_call命令调用weatherapi_tool_python weatherapi_tool_python在初始化时通过cmd类型的tool_register向llm注册自身- 工具返回结果后,
llm继续处理并生成最终回复
3.4 语音回复输出
tts [音频帧] → agora_rtc [发送到用户]
    [完成通知] → agora_rtc [结束流]
- 语音合成:
agora_rtc将合成的语音通过RTC通道播放给用户
3.5 UI消息展示
message_collector [汇总消息] → agora_rtc [数据通道] → 客户端UI
- 消息收集:
agora_rtc通过数据通道将消息发送到客户端- 用于在用户界面上显示对话历史
3.6 用户事件处理
agora_rtc [用户事件] → llm [状态更新]
当用户加入、离开或连接失败时:
on_user_joined: 用户加入事件on_user_left: 用户离开事件on_connection_failure: 连接失败事件llm可能根据这些事件调整其行为(如发送欢迎消息)
4. 完整会话示例
以一个天气查询为例说明整个流程:
- 用户说:"今天北京天气怎么样?"
agora_rtc捕获音频 →stt转文本- 文本发送到
interrupt_detector和message_collector
llm分析用户问题,决定需要天气信息- 通过
tool_call调用weatherapi_tool_python - 天气API返回北京天气数据
llm生成回复:"根据最新数据,今天北京天气晴朗,气温20-28°C,建议适当防晒。"
- 通过
- 回复同时发送到两处
tts将回复转为语音message_collector记录对话
- 语音输出和UI更新
tts合成的语音通过agora_rtc播放给用户- 对话记录通过
message_collector→agora_rtc显示在用户界面
- 用户可随时打断
- 如用户说"停一下",
interrupt_detector检测到中断 - 发送
flush命令终止当前响应流程
- 如用户说"停一下",
这种模块化、事件驱动的架构使voice_assistant能够处理复杂的对话场景,同时保持代码的可维护性和扩展性。通过配置文件定义的连接,模块间不需要直接依赖,实现了松耦合设计。
[extension]WeatherAPI Tool Python 扩展分析
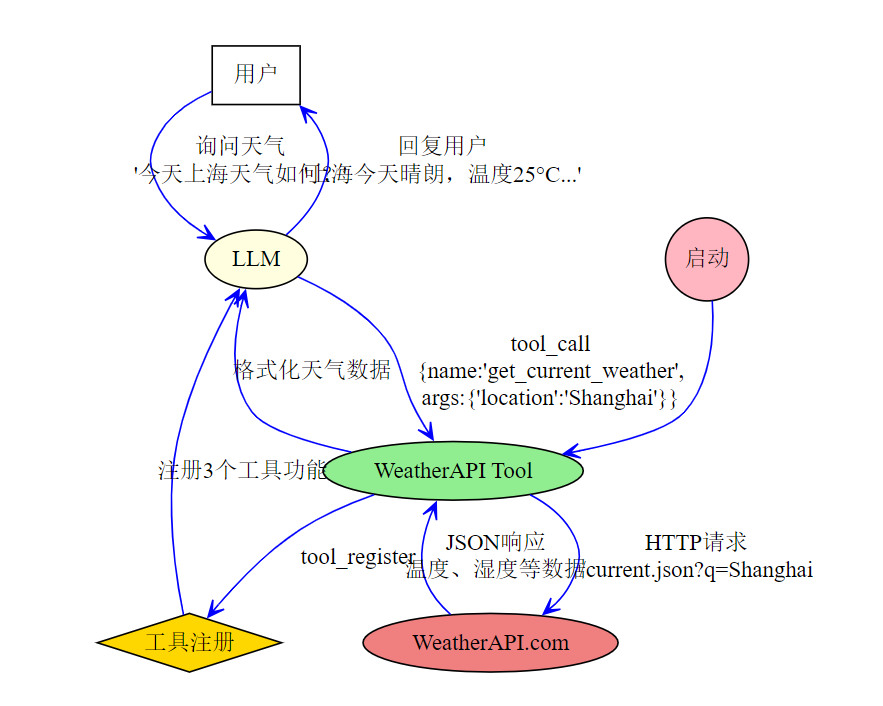
WeatherAPI Tool 是一个为语言模型提供天气信息查询能力的扩展模块。它通过 WeatherAPI.com 的服务获取天气数据,并将这些数据提供给对话系统。
主要功能
- 当前天气查询 (
get_current_weather)- 获取指定位置的当前温度、湿度、风速等信息
- 历史天气查询 (
get_past_weather)- 查询过去7天内的历史天气数据(受免费API限制)
- 需要指定位置和日期
- 天气预报查询 (
get_future_weather)- 提供未来3天的天气预报(受免费API限制)
- 包含每日的最高/最低温度、天气状况等
接口设计
对外接口
- 输出命令 (Cmd Out):
tool_register: 在启动时自动向LLM注册工具元数据,提供工具名称、描述和参数定义
- 输入命令 (Cmd In):
tool_call: 接收来自LLM的工具调用请求,包含工具名称和参数
参数要求
- 配置参数:
api_key: WeatherAPI.com 的API密钥,必填项(通过环境变量配置)
- 工具参数:
- 当前/未来天气查询: 需要
location参数(城市名,如"San Francisco, CA") - 历史天气查询: 需要
location和datetime参数(日期格式如"2024-10-09")
- 当前/未来天气查询: 需要
工作流程
初始化流程
启动 → 加载配置 → 创建HTTP会话 → 注册工具到LLM → 等待调用
工具调用流程
LLM收到天气相关查询 → 发送tool_call命令 → 扩展解析参数 →
调用WeatherAPI → 解析返回结果 → 返回格式化数据到LLM → LLM整合信息到对话
Graphviz 可视化
模块结构
digraph WeatherAPI {
    rankdir=LR;
    node [shape=box, style=filled, fillcolor=lightblue];
    edge [color=black, arrowhead=vee];

    llm [label="LLM\n(语言模型)", fillcolor=lightyellow];
    weather_tool [label="WeatherAPI Tool", fillcolor=lightgreen];
    external_api [label="WeatherAPI.com\n服务", fillcolor=lightcoral, shape=cloud];

    subgraph cluster_weather_tool {
        label="WeatherAPI Tool 内部组件";
        style=dashed;
        bgcolor=lavender;

        tool_register [label="工具注册组件"];
        current_weather [label="当前天气查询"];
        history_weather [label="历史天气查询"];
        forecast_weather [label="天气预报查询"];
    }

    llm -> weather_tool [label="tool_call\n(调用工具)"];
    weather_tool -> llm [label="tool_register\n(注册工具)\ntool_result\n(返回结果)"];

    weather_tool -> external_api [label="HTTP 请求"];
    external_api -> weather_tool [label="JSON 响应"];

    weather_tool -> tool_register;
    weather_tool -> current_weather;
    weather_tool -> history_weather;
    weather_tool -> forecast_weather;
}
数据流程
技术实现说明
- 异步处理:
- 使用
aiohttp和asyncio进行异步HTTP请求- 实现
AsyncLLMToolBaseExtension接口- 工具定义:
- 通过
LLMToolMetadata和LLMToolMetadataParameter定义工具结构- 支持自定义参数验证和处理
- 结果处理:
- 通过
LLMToolResultLLMResult返回结构化数据- 根据不同查询类型处理和格式化结果
- 安全处理:
- 参数验证确保必要字段存在
- 异常捕获和日志记录
- 避免API密钥硬编码,通过环境变量获取
这个扩展模块很好地展示了如何将外部API服务集成到AI对话系统中,使语言模型能够提供实时、准确的天气信息,增强用户体验。
[extension]OpenAI ChatGPT Python 扩展详细分析
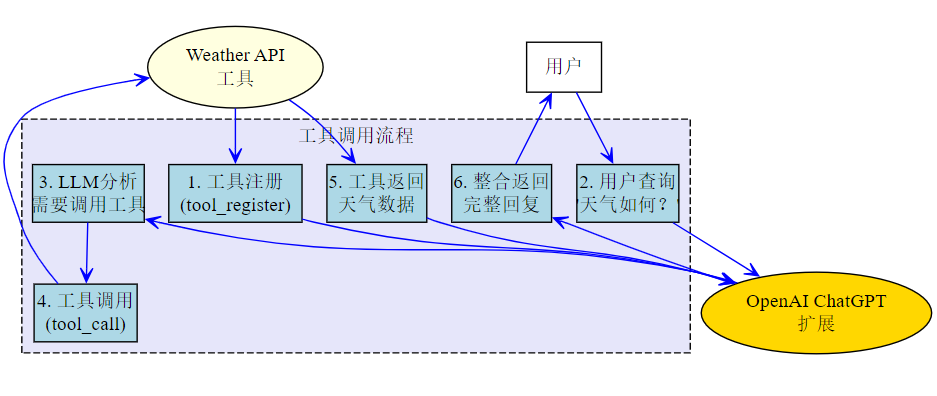
OpenAI ChatGPT Python 扩展是 TEN 平台中的核心 AI 引擎,为整个代理系统提供智能对话能力。这个扩展通过集成 OpenAI 的 GPT 模型,赋予代理自然语言处理和生成能力。
主要功能:
- 语言模型集成
- 连接到 OpenAI 的 GPT 模型(如 GPT-4、GPT-3.5)
- 支持替代服务提供商(通过自定义
base_url,如 DeepSeek、Azure OpenAI)- 处理用户文本输入并生成智能回复
- 流式响应处理
- 支持逐字生成的流式输出,实现自然对话体验
- 句子级别的处理和输出,使回复更加流畅
- 工具调用框架
- 接收和管理外部工具注册(如
weatherapi_tool_python)- 识别何时需要调用工具,生成正确的工具调用参数
- 处理工具返回结果并整合到对话流程中
- 上下文管理
- 维护对话历史记录(基于
max_memory_length配置)- 支持多轮对话的连贯性和上下文理解
- 会话管理
- 监听用户加入/离开事件
- 自动发送欢迎消息(通过
greeting参数配置)- 支持中断和刷新当前生成(
flush命令)技术实现
数据流程
digraph OpenAIChatGPTFlow { rankdir=LR; node [shape=box, style=filled, fillcolor=lightblue]; edge [color=black, arrowhead=vee]; input [label="文本输入\n(text_data)", fillcolor=lightgreen]; processor [label="OpenAIChatGPTExtension\n处理器", fillcolor=gold]; subgraph cluster_memory { label="内存管理"; style=dashed; memory [label="对话历史\n(memory)"]; cache [label="临时缓存\n(memory_cache)"]; } api [label="OpenAI API\n或Azure OpenAI", shape=cloud, fillcolor=lightcoral]; tools [label="外部工具\n(如天气查询)", fillcolor=lightyellow]; output [label="文本输出\n(text_data)", fillcolor=lightgreen]; input -> processor; processor -> memory [label="存储对话"]; processor -> api [label="API请求"]; api -> processor [label="流式响应"]; processor -> tools [label="工具调用"]; tools -> processor [label="工具结果"]; processor -> output; cache -> processor [label="临时处理"]; }工具集成机制
配置参数
扩展提供丰富的配置选项,可以通过
property.json自定义:
| 参数 | 说明 | 默认值 |
|---|---|---|
api_key |
OpenAI API 密钥 | 环境变量 OPENAI_API_KEY |
model |
使用的模型名称 | 环境变量 OPENAI_MODEL |
base_url |
API 基础 URL(可替换为其他兼容服务) | "" (OpenAI 默认) |
max_tokens |
生成最大标记数 | 512 |
frequency_penalty |
重复惩罚系数 | 0.9 |
greeting |
用户加入时的欢迎语 | "TEN Agent connected..." |
max_memory_length |
记忆对话轮数 | 10 |
proxy_url |
代理服务器地址 | 环境变量 OPENAI_PROXY_URL |
- 异步处理:使用 Python
asyncio 实现非阻塞操作
- 事件驱动:基于事件回调处理内容更新和工具调用
- 思考模式:支持
<think>...</think> 标签或 reasoning_content 参数的思考过程
- 灵活适配:支持不同的 OpenAI API 实现(标准、Azure)
asyncio 实现非阻塞操作<think>...</think> 标签或 reasoning_content 参数的思考过程通过这个扩展,TEN 平台能够提供智能、上下文感知的对话体验,并无缝集成各种功能扩展,形成一个完整的智能助手系统。
LLM 工具调用实现分析
LLM 如何知道要用哪些工具是整个 AI 代理系统中的关键流程。通过分析代码,我可以详细解释这个机制:
1. 工具注册机制
工具需要先向 LLM 注册才能被使用。这个过程通过 tool_register 命令实现:
# openai_chatgpt_python/extension.py
async def on_cmd(self, async_ten_env: AsyncTenEnv, cmd: Cmd) -> None:
    # 处理各种命令,包括来自工具的注册
    # 这里会调用父类 AsyncLLMBaseExtension 的 on_cmd 方法处理 tool_register
    await super().on_cmd(async_ten_env, cmd)
关键是扩展继承的 AsyncLLMBaseExtension 类,它在 ten_ai_base/llm.py 中实现工具注册:
# 这是 ten_ai_base/llm.py 中的伪代码实现
async def on_cmd(self, ten_env: AsyncTenEnv, cmd: Cmd) -> None:
    cmd_name = cmd.get_name()
    if cmd_name == "tool_register":
        # 从命令中提取工具元数据
        tool_metadata = self._extract_tool_metadata(cmd)

        # 将工具添加到注册表
        self.registered_tools[tool_metadata.name] = tool_metadata

        # 返回成功结果
        cmd_result = CmdResult.create(StatusCode.OK)
        await ten_env.return_result(cmd_result, cmd)
2. 工具信息传递给 OpenAI
在创建聊天完成请求时,LLM 会将所有注册的工具转换为 OpenAI 工具格式:
# openai_chatgpt_python/extension.py 中的 chat_completion 方法
async def chat_completion(self, async_ten_env: AsyncTenEnv, messages):
    # 获取所有注册的工具
    tools = [self._convert_tools_to_dict(tool) for tool in self.registered_tools.values()]

    # 创建异步任务获取聊天完成
    await self.client.get_chat_completions_stream(
        memory + messages, tools, listener
    )
工具转换的关键函数:
def _convert_tools_to_dict(self, tool: LLMToolMetadata):
    json_dict = {
        "type": "function",
        "function": {
            "name": tool.name,
            "description": tool.description,
            "parameters": {
                "type": "object",
                "properties": {},
                "required": [],
                "additionalProperties": False,
            },
        },
        "strict": True,
    }

    for param in tool.parameters:
        json_dict["function"]["parameters"]["properties"][param.name] = {
            "type": param.type,
            "description": param.description,
        }
        if param.required:
            json_dict["function"]["parameters"]["required"].append(param.name)

    return json_dict
3. LLM 决定调用工具
关键点: LLM 决定何时使用工具完全是 OpenAI 模型(如 GPT-4)自己的决策,不是代码控制的。这发生在 openai.py 的 get_chat_completions_stream 方法中:
# openai.py
async def get_chat_completions_stream(self, messages, tools=None, listener=None):
    req = {
        "model": self.config.model,
        "messages": [
            {"role": "system", "content": self.config.prompt},
            *messages,
        ],
        "tools": tools,  # 这里把工具信息传给 OpenAI
        "temperature": self.config.temperature,
        # 其他参数...
        "stream": True,
    }

    response = await self.client.chat.completions.create(**req)
4. 处理工具调用
当模型决定调用工具时,OpenAI 会在响应中返回 tool_calls。代码在流式响应中检测这些调用:
# openai.py
async for chat_completion in response:
    # ...
    if delta.tool_calls:
        for tool_call in delta.tool_calls:
            if tool_call.id is not None:
                tool_calls_dict[tool_call.index]["id"] = tool_call.id

            # 收集工具名称和参数
            if tool_call.function.name is not None:
                tool_calls_dict[tool_call.index]["function"]["name"] = tool_call.function.name

            tool_calls_dict[tool_call.index]["function"]["arguments"] += tool_call.function.arguments
            # ...

# 完成后通知监听器
if listener and tool_calls_list:
    for tool_call in tool_calls_list:
        listener.emit("tool_call", tool_call)
5. 实际执行工具调用
在 extension.py 中,当收到工具调用事件时,会执行相应工具:
async def handle_tool_call(tool_call):
    try:
        # 获取工具名称和参数
        tool_name = tool_call["function"]["name"]
        tool_args_str = tool_call["function"]["arguments"]
        tool_args = json.loads(tool_args_str)

        # 创建任务跟踪
        self.tool_task_future = asyncio.Future()

        # 发送调用命令到特定工具
        cmd = Cmd.create(CMD_TOOL_CALL)
        cmd.set_property_string("name", tool_name)
        cmd.set_property_string("args", tool_args_str)

        # 调用工具
        result = await async_ten_env.send_cmd_sync(cmd)
        # 处理结果...
完整流程图
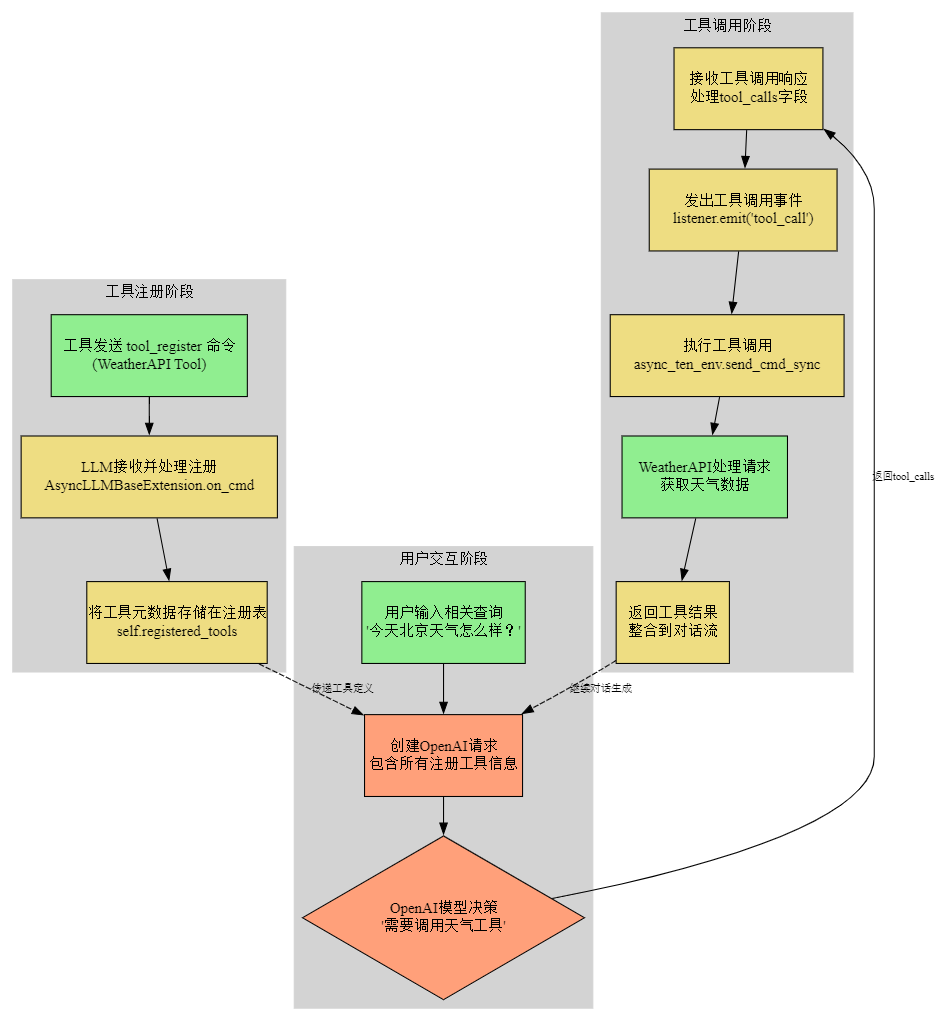
digraph ToolCallFlow {
    rankdir=TB;
    node [shape=box, style=filled, fillcolor=lightblue, margin=0.3];
    edge [color=black, fontsize=10];

    // 注册阶段
    subgraph cluster_registration {
        label="工具注册阶段";
        style=filled;
        color=lightgrey;

        register [label="工具发送 tool_register 命令\n(WeatherAPI Tool)", fillcolor=lightgreen];
        process_register [label="LLM接收并处理注册\nAsyncLLMBaseExtension.on_cmd", fillcolor=lightgoldenrod];
        store_tool [label="将工具元数据存储在注册表\nself.registered_tools", fillcolor=lightgoldenrod];
    }

    // 用户交互阶段
    subgraph cluster_user_interaction {
        label="用户交互阶段";
        style=filled;
        color=lightgrey;

        user_input [label="用户输入相关查询\n'今天北京天气怎么样?'", fillcolor=lightgreen];
        openai_request [label="创建OpenAI请求\n包含所有注册工具信息", fillcolor=lightsalmon];
        openai_decision [label="OpenAI模型决策\n'需要调用天气工具'", shape=diamond, fillcolor=lightsalmon];
    }

    // 工具调用阶段
    subgraph cluster_tool_execution {
        label="工具调用阶段";
        style=filled;
        color=lightgrey;

        receive_tool_call [label="接收工具调用响应\n处理tool_calls字段", fillcolor=lightgoldenrod];
        emit_event [label="发出工具调用事件\nlistener.emit('tool_call')", fillcolor=lightgoldenrod];
        execute_tool [label="执行工具调用\nasync_ten_env.send_cmd_sync", fillcolor=lightgoldenrod];
        weather_api [label="WeatherAPI处理请求\n获取天气数据", fillcolor=lightgreen];
        return_result [label="返回工具结果\n整合到对话流", fillcolor=lightgoldenrod];
    }

    // 连接各阶段
    register -> process_register -> store_tool;
    user_input -> openai_request;
    store_tool -> openai_request [label="传递工具定义", style=dashed];
    openai_request -> openai_decision;
    openai_decision -> receive_tool_call [label="返回tool_calls"];
    receive_tool_call -> emit_event -> execute_tool;
    execute_tool -> weather_api;
    weather_api -> return_result;
    return_result -> openai_request [label="继续对话生成", style=dashed];
}
小结
这个设计实现了 LLM 和工具之间的松耦合,使系统能够灵活地添加新工具,同时保持代码的可维护性。
No comments yet.